Saturday 21 October 2017

EBike

This is a project for my Father.

My Dad is 82 years young, he's way fitter than I ever was or ever will be, he gets upset if he doesn't do 100 miles each week on his bicycle, he did Lands End to John O'Groats solo in his 70th year.
When he was young, he used to to do bicycle road racing with a cycle club in Manchester, it's where he met my mother. During that time he had a bicycle built especially for him. That bicycle is now 66 years old, still his favourite, but he's losing feeling in his feet and legs and can no longer ride his favourite bike.

So, see here:
https://www.thingiverse.com/thing:2191603
I'm planning on re-creating this attached to his bike.
Costing a fortune (relative to my usual projects), lots of power, dangerous enough to take off fingers.
We don't really need the speed and a pure Ebike as such, what we would like is a system that will give him a bit of a boost only when needed, or take him home if he bites off more than he can chew.
Ok, so I'm playing it by ear really as usual....

I've bought all the parts, got some, awaiting others, soon I'll be able to start putting it together.
Spent £360, that might be the total.
Motor, battery, VESC board (with spllied capacitors and connectors).

Drive pinion and belt coming from Ebay.
10 AWG and 12 AWG wires and connectors ordered from Ebay. 
Most VESC components ordered from Mouser, rest from Farnell.
Saddle bag and thumb throttle ordered from Banggood.


Wednesday 18 October 2017

Rock Tumbler

My Granddaughter is now 8 years old, during walks she has always collected pretty stones.
So, I thought about getting her a stone polisher, was a bit shocked at the price, talking £80 for a cheap one, £115 for a good one, but they go up to thousands!
So, I've created a very simple stone polisher of my own design. It's still very much a work in progress.

Stone Polishing is long term, there are usually 4 levels of grit from coarse through to polish. The stones need to be tumbled at approximately 1 turn per second for a complete week for each stage.
So far I have done 1 week of coarse and am currently on day 3 of stage 2, so early stages.
Been no problems so far.....
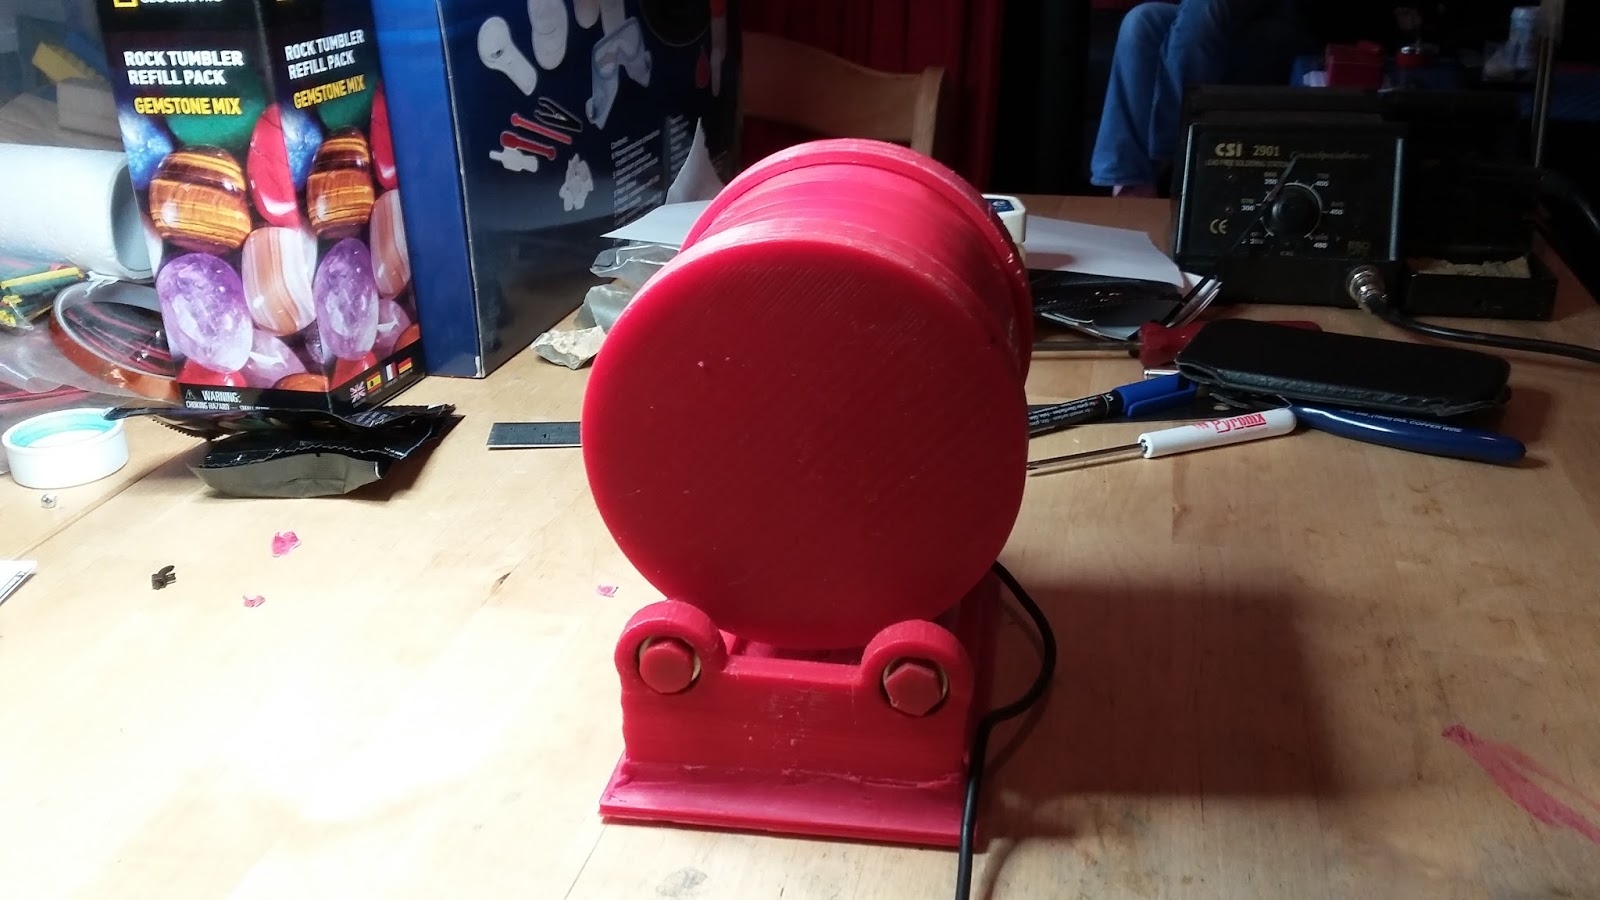
Basic design:

Photo of final result.
4 off standard Skate Board 608ZZ, I get these from EBay at 10 off for £2.32.
1 off Flextec FRC365SA DC motor, I bought these off EBay some time back:
  • Flextec motor
  • FRC365SA,Dc Motor,41V,17000RMP,air compressor
  • 3-12v NOMINAL 12v
  • No Load: 25500 RPM, 0.40 Amp
  • Max Efficiency 20930 RPM, 1.83 Amp, Torque 5.36 mN.m 54.6 g.cm 11.7 Watt
  • Stall Torque 29.9 mN.m 305 g.cm 8.4 Amp

Motor is directly soldered to a Maplin mains PSU:

Small gear is mounted to motor using 2 off M2 nuts and grub screws. I also had to create flats on motor spindle.

Rollers are printed and threaded internally.
Rollers are coated with Ooogoo rubber, mould printed.
For Oogoo, see here:
I use 1 part Cornflour to 1 part Silicon and I colour it with printer ink to any colour I choose.
In this case rollers are covered with Magenta Oogoo.
Drum is sealed with a layer of red Oogoo inside both caps.
Drum centre is covered in a layer of Oogoo, then covered in a layer of red electricians tape.
Whole base is sealed with red Oogoo.

It's LOUD, gears make a noise, plus exposed gears could be a safety hazzard, so I added a cover over the gears, that made the gears quieter, but still too loud. Originally I ran it without grit or water, imagine stones tumbling once per second!
So, I built a sound box. Simple ply wood, glued together with PVA glue, then used carpet tiles (lying around) to carpet the plywood box on inside AND outside:
See photo of tumbler, it is mounted to base of ply carpeted box, this box goes over like a hood. Granddaughters name signifies side with cable exit.
More photos:


It's running now in bedroom directly upstairs from where I am sitting, I can just hear it rumbling in the background.
After 1 week of coarse tumbling, stones were nicely rounded, it is working as expected so far.
But time will tell.....

Motor died during last day of 1st week, I hoped this was a bad motor, so switched it for a new one.
After 5 days of second week, motor gave out. They seem to still work but have no power.
So, this time I took both motors apart, suspected brushes were worn out.
Brushes look fine, everything looks fine!
I dressed the armature (where the brushes rub) very carefully with a fine needle file.
Put it all back together, back to fully working.

Coarse week complete, medium week complete, fine next, then polish.
Stones looking really good, these are stones collected by my Granddaughter, not specifically stones normally tumbled, dying to see how they end up.
Maybe I'll try drilling some of them.


Mechy

This is a toy I created for my 5 year old Grandson and 8 year old Granddaughter.
Basically it's just pieces with holes plus nuts and bolts for putting them together.
I've been working upon this for a couple of weeks, they took home the unfinished parts I had been working upon and have been happily playing with them ever since, their Mum and Dad are impressed and have been building things with them (I have no idea what).
Grandson is so happy with it that he has taken it to school for 'Show and Tell'.
A lot of pieces:

This is a design for a model that can be built, a hand cranked fan. 3:1 ratio gears mean fan turns at 3 times the speed you crank it:

Works well:

Here's a design slightly expanded with dual gear chain:


Not built it yet, there is also an incomplete design for a model Cessna single engined plane. Not printed all the bits for that yet.


My 3D Printer

I finished building my printer in July 2012 (making it 5 years old now), it looks like this:
It's a Metric Mendel Prusa with LM8UU bearings, build details here:
I bought the plastic printed parts off EBay for around £65 and built the rest myself, total cost around £250. 
Controller is an Arduino ATMega 2560 with RAMPS 1.3 driver board. I bought the RAMPS PCB and loaded it myself including POLULU driver modules.
Currently running Marlin 1.0.2+ firmware.
It's a standard MK2 PCB based heated bed with Pyrex glass. The bed is still mounted on 3 off LM8UU bearings (original design, not the one shown in RepRap Wiki).
The cold end is a slightly modified Wade Extruder, hobbed bolt made by me.
The hot end is old style:
M6 steel bolt modified in old pillar drill, filed off threads at business end, centre drilled with 3 mm drill to as close to end as possible, centre drilled 0.5 mm. 16 mm diameter PEEK insulator with PTFE sleeve. PEEK is tapped to take M6 steel end. M6 steel end screwed into PEEK. Kapton tape used for electrical insulation of steel hot end, thermister, thermister wires, Nichrome heater wire. Nichrome wire is covered in kapton tape, then wound around M6 hot end. Finally fibre glass strand is wrapped around assembly to keep heat in and final layer of kapton tape added.
It works, I think it's fast enough and accurate enough for my use, but you can judge for yourself (see shortly).

I use OpenSCAD (currently version 2015.03-2) for design, producing .stl files, Slic3r (currently Version 1.2.9) for slicing to .GCODE, Pronterface (Printrun 2014.03.10) to control printer over USB serial running at 250,000 baud.

On Thingyverse, I am TrevM, see:
All designs have been done by me in OpenSCAD, printed by me on this printer and all designs include photographs. You can use the photos to decide on the output quality of my printer for yourself.